 Here’s a scenario. You’ve been given a cultural resources survey project somewhere in the United States that is going down ASAP. You have no idea where this is. Neither do any of your co-workers or acquaintances. You do not have the records search yet and have no idea what archaeological or other historical properties are nearby. There may even be previously recorded properties inside your project area. All you have is a paper map with a dot or squiggle on it that is supposed to show you where a project of some sort is going down. In addition to getting ready to go out on a survey tomorrow, you need to have some idea what to expect. What do you do?
Here’s another scenario. You’re a field tech that is on a survey with a totally inept crew chief/ field director. She/he keeps saying the fatal statements, “I don’t know” or “I don’t care” whenever you ask if you should be recording the numerous collapsed sheds, utility transmission lines, and canals encountered within the project area. Based on the age and disrepair of the buildings in the project, you get the sinking feeling that you guys are missing things but you don’t know if they’re historical or not. What do you do?
Here’s what you do: a 30-Minute Online Map Blitz.
The main goal of an online map blitz is to quickly identify locations within or adjacent to your project area that are likely to contain historical or prehistoric cultural resources. This can easily be done on any type of computer that is hooked up to the internet, but you can still do much with a smartphone or tablet and decent 3G or 4G reception. Harnessing the power of the internet, you can quickly find a wealth of background information on any location in the lower 48 (I don’t know about Alaska, Hawaii, or any of the U.S. territories). I like to spend a couple hours doing the background geographic research, but I’ve been known to do it using my phone while somebody else drives us to the project.
Most of the following resources are free to use. Of course, there is a bunch of proprietary stuff out there that can help too. You can do a map blitz without any paid apps or software. These are just a few of the most obvious and easy to use online geographic resources that are available to everyone, especially those of us west of the Appalachian Mountains.
Here are the basics of a 30-Minute Map Blitz:
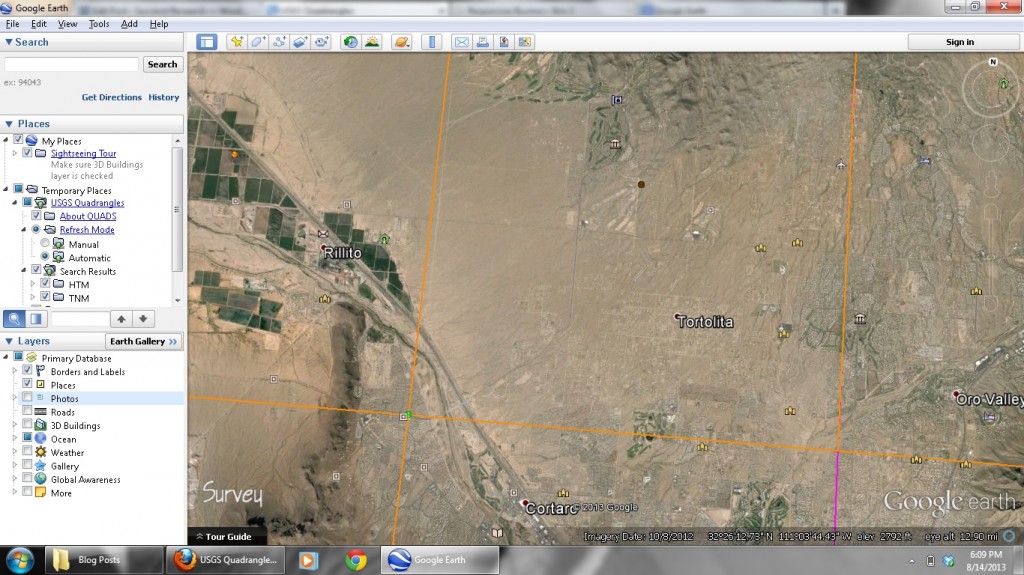
1. Get some sort of an idea where the project is at. There may be some sort of topographic feature nearby (stream, wash, river, mountain, ect.), road, intersection, or building that you can use to position your project area. Use Google Earth (www.googleearth.com) because it allows you to make additions to the base map that you can use on your smartphone or tablet computer in the field.
2. Mark the location on Google Earth. If you’re lucky, you can get your mapping department to create a KML file of the project that you can use on your phone/computer. Use the placemark function (It’s the thumb tack icon on the toolbar. Click the icon and drag it to your project area. Make sure settings are set to UTMs). This will give you the UTMs as well, which are useful when you’re using a Trimble or Garmin.
Now that you know where the project is, you can do several things:
3. Check out the terrain using the USGS quadrangles. Download the USGS QUADS plugin for Google Earth (http://www.metzgerwillard.us/quads/quads.html). This plugin will give you the name of the quadrangle you’re working in.
You can see an actual image of that quadrangle on the USGS Map Locator website (http://store.usgs.gov/b2c_usgs/usgs/maplocator/%28xcm=r3standardpitrex_prd&layout=6_1_61_48&uiarea=2&ctype=areaDetails&carea=$ROOT%29/.do). The USGS Map Locator uses Google Maps instead of Google Earth. You can download historical USGS quadrangles at the US Topo and Historical Topographic Map Collection (http://geonames.usgs.gov/pls/topomaps/f?p=262:1:1982208549220292). There is also a proprietary USGS topo overlay plugin that I use, but I don’t think I can share it in this post and can’t remember where I got it.
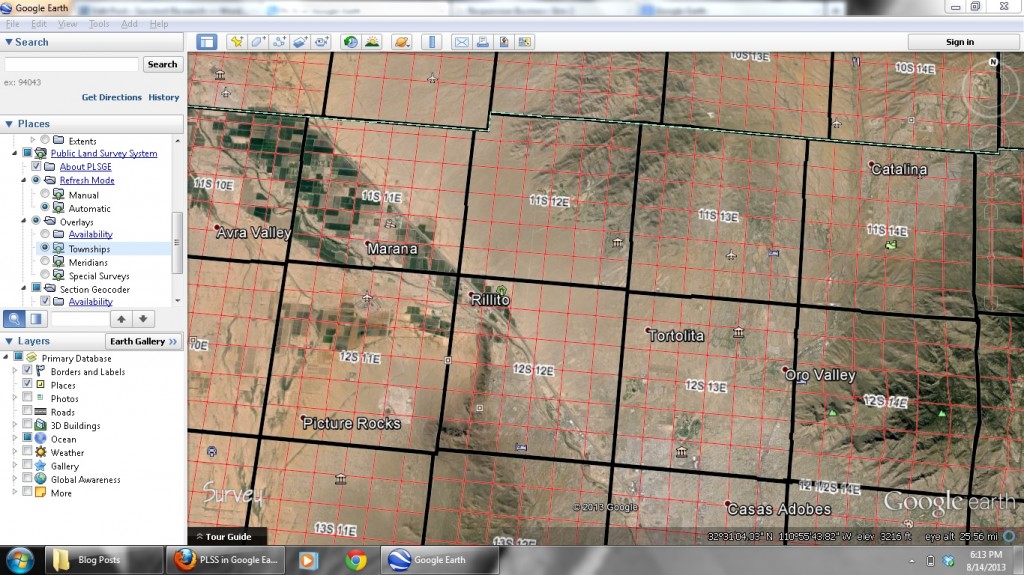
4. Find out when somebody bought or assumed this parcel. You can use the PLSS for Google Earth plugin (http://www.metzgerwillard.us/plss/plss.html) to figure out the township and range information for a given location. Download the plugin and it will be installed on Google Maps (sometimes you have to install it yourself, but usually it automatically installs). Turn on the township and range overlay on PLSS and go back to the placemark for your project area.
You can automatically see the county labels in Google Earth (https://support.google.com/earth/answer/148130?hl=en).
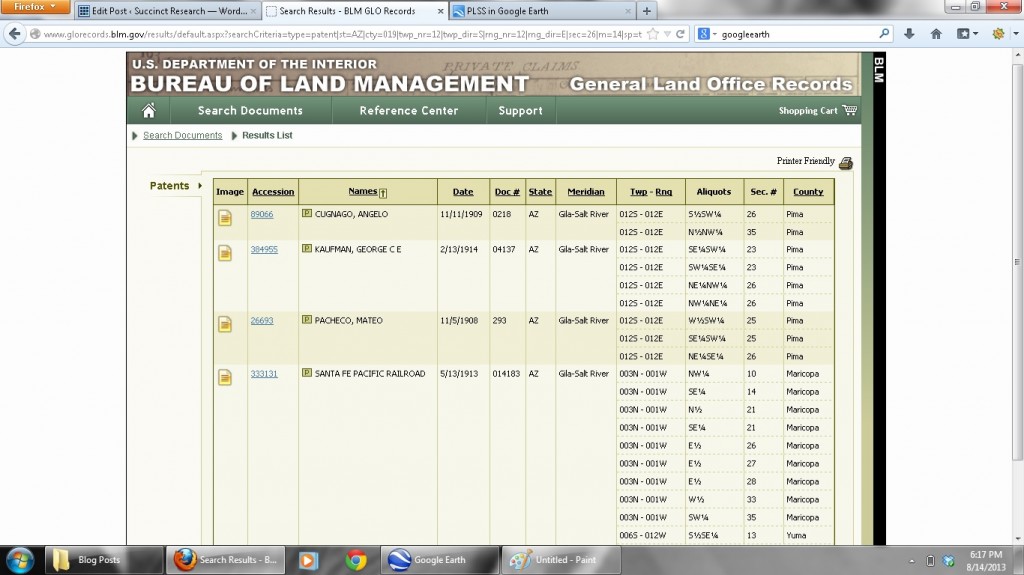
Once you know the county, township, and range, you can look up the parcel’s original ownership from the government through the Bureau of Land Management’s (BLM) General Land Office (GLO) records (http://www.glorecords.blm.gov/search/default.aspx) (NOTE: the GLO records only cover lands included in the Public Land Surveys, which are primarily west of the Appalachian Mountains. Sorry easterners). The GLO records are often linked to maps of the original surveys and files that contain the original survey notes.
5. Check the digital map archives. Most states and some counties or cities have digital archives that you can search for free or with a library card. Look for photos of your project area and/or nearby towns, historical road maps, and oral histories.
If you’re lucky, you can get access to the Digital Sanborn Maps (http://www.proquest.com/en-US/catalogs/databases/detail/sanborn.shtml). Be warned, ProQuest, who owns the digital Sanborn library, will let you check them out on a trial basis but will eventually ask you to pay for them. This is a totally legitimate request to your company because it’s useful for NEPA records checks as well as CRM surveys. Some libraries give you free access to the Digital Sanborns. I have access through the Seattle Public Library (http://www.spl.org/library-collection/articles-and-research/history-biography-and-maps).
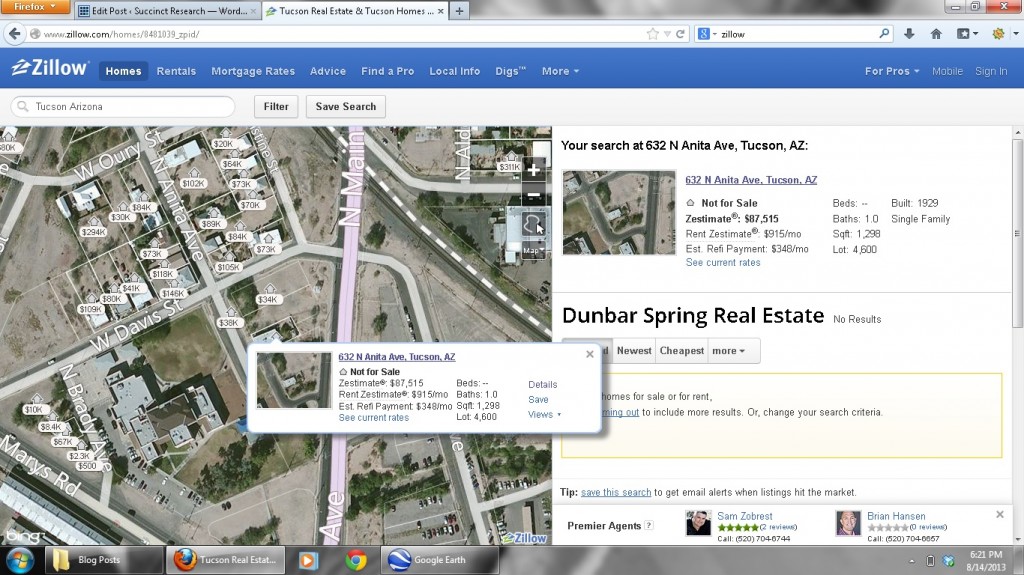
6. If you know the project’s address or approximate street location, you can look at the county assessor’s records or Zillow. The exact search method changes based on the county assessor’s website you’re working with, but there’s usually an address-based search function.
If you can’t access the assessor’s records, look up your project on Zillow (http://www.zillow.com/). Zillow will give you the build date of almost any dwelling and many commercial buildings, a brief description of the building (foundation material, air conditioning, how many rooms, how many stories, how many apartments/ units are in the building, ect.). ZIllow gives you information that can help you address building integrity (i.e. if alterations have diminished the building’s historical value). It will also give you info on nearby buildings, which may help you figure out if there are any potential historic properties nearby.
7. Check to see if you are working in a historic district/neighborhood. Zillow should tell you the name of the neighborhood you’re working in. The assessor’s record will tell you what subdivision you’re in. You can use this information to see if you’re in a historic neighborhood or a National Register district. Larger cities oftentimes list the historic districts in their incorporated boundaries on the internet. If all else fails, check the National Register of Historic Places (NRHP) Program: Research (http://www.nps.gov/nr/research/). The NRHP database has many, but not all sites, buildings, structures, and districts. Sometimes, you can download the NRHP eligibility form if it’s been digitized.
8. Do additional background research. If your project was patented by anyone in the past, you now have a family name that you can research online. You can do even more if you have access to Ancestry.com (www.ancestry.com/), which costs money. If you draw a blank on the family that patented your parcel, search several of the nearby land owners.
The main goal is to figure out as much about the geography and history of the project area as you can before you go out into the field or before the field effort is over. A secondary goal is to find project-specific landscape features that will help you figure out approximately how many historical things (structures, roads, houses, buildings, ect.) you may find while you’re out there. You can also use USGS quads to quickly identify location where prehistoric sites are likely (For example, flat landforms in close proximity to water).
Here’s how I usually do a 30-minute background blitz. It usually doesn’t matter if I’m working inside or outside of the city limits. Remember, my goals are to 1) check out the terrain and see if I can even get to the project, 2) identify places where prehistoric people lived, 3) figure out if there are any historic properties or historical archaeological sites in the project.
(Disclaimer: Most mid-sized and large CRM or environmental companies already have the GLOs and USGS quads. They usually have a GIS specialist that can overlay your project area on top of the GLO, USGS, and any historical maps you find. You can also ask them to give you the KML file of the project polygon so you can upload it to your smartphone/tablet. If this is the case, you can concentrate on checking out the GLO records, county assessor’s records, or Zillow to get an idea of the area’s age.)
(NOTE: This 30-minute blitz works awesomely for proposal background research. You can quickly estimate how many historical buildings, bridges, roads, utility lines, houses, ect., which makes level of effort determinations that much more accurate.)
0–10 minutes— Create Google Earth file of the approximate project area location if it has not already been done. Identify the township and range information and check out the historical and current USGS quadrangles.
10–20 minutes— Look up the GLO records for this location. See when it was patented and download a PDF of the GLO map of that township and range. Look for any other historical structures outside your project.
20–30 minutes— If you’re in the city, spend the last few minutes looking at the assessors records, Zillow or digital map archives to figure out when the local area was built up. If you’re in the country, take the time to look for any historical maps that may show you additional features. Use any remaining time to look at the NRHP or city/local historic preservation documents for this location.
Make sure to take notes on paper or a electronic document you can access in the field.
By the time you’ve finished this exercise, you should have a very basic idea of the age of local buildings and an idea of where you may find prehistoric sites. You might also see that there are no roads where you’re going, impenetrable swamps, or that your project is on a precipitous cliff and unsurveyable. You might have some problems if that’s the case.
You don’t have to be the crew chief or field director to conduct a little geographic background research. If no one else has done this research, you can save your company’s ass by doing it yourself. Everyone should feel empowered to do a good job. The geographic background of a project should be researched as soon as possible, especially if you are still in the field or have not left for the field.
Tell me how you conduct online map research. Or, if you have any questions or comments, write below or send me an email.
 “Resume-Writing for Archaeologists” is now available on Amazon.com. Click Here and get detailed instructions on how you can land a job in CRM archaeology today!
 Small Archaeology Project Management is now on the Kindle Store. Over 300 copies were sold in the first month! Click Here and see what the buzz is all about.
Join the Succinct Research email list and receive additional information on the CRM and heritage conservation field.


